Flooring & Tile
Garage Floor Tile Calculator — Tiles, Packs and Ramp Edges
Measure one main garage rectangle plus up to two offsets, then calculate exact tile equivalents, whole packs and optional straight ramp-edge pieces for the garage-door opening.
Formula tested · Local units · No sign-up
Project inputs
Enter measurements
Use your preferred units. Results update automatically.
Show the calculation methodFormula, conversions, rounding, and assumptions+
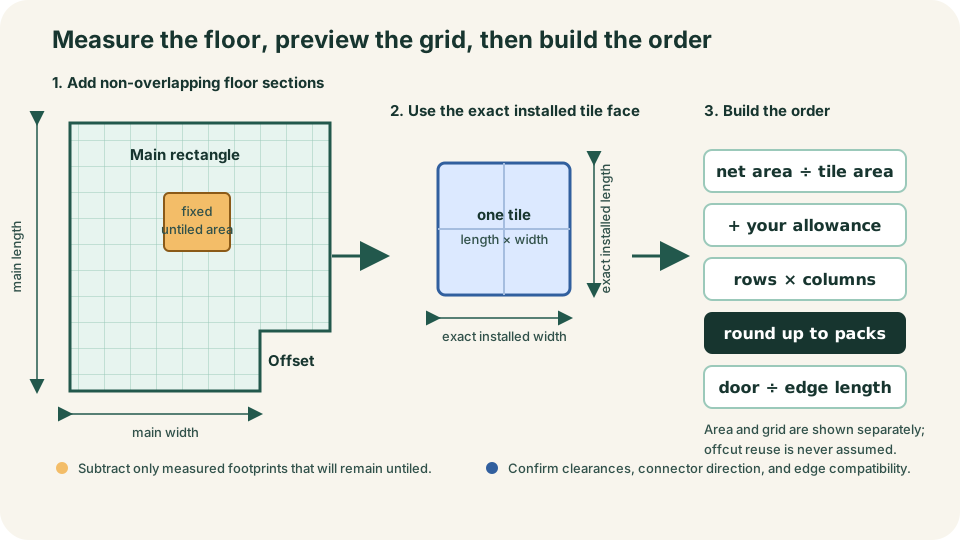
Gross measured floor area = main rectangle + any complete Section 2 and Section 3 rectangles. Each section is length × width, so an L-shaped or offset floor can be split into non-overlapping rectangles.
Net floor area to tile = gross measured area − the untiled obstruction area you enter. Do not subtract movable items or areas that will receive tile beneath them.
Theoretical area minimum = net floor area ÷ exact installed face area of one tile. The tile face area is exact installed tile length × exact installed tile width from the current product data.
Area-based tile quantity = theoretical area minimum + your selected cut/spare percentage, rounded up once. This is an area method, not proof that every perimeter cut can be reused.
Area-method packs = area-based tile quantity ÷ tiles per pack, rounded up. Pack rounding is shown separately as tiles supplied beyond the area calculation.
Main-rectangle grid positions = tile positions along the entered main length × positions across the entered main width, both rounded up. The preview shows partial final strips and a conservative pack count when every grid position uses a new tile; it does not promise offcut reuse.
Optional straight ramp-edge pieces = measured garage-door opening width ÷ the exact compatible edge-piece length, rounded up. Connector orientation, corners, cuts, and accessory pack quantities remain product-specific.
Optional cost = whole packs × the pack price you enter, plus the sales-tax percentage you enter. No tile price, tax rate, freight, accessory cost, or labor rate is assumed.
Real-world example
20 ft × 20 ft garage with a 4 ft × 5 ft offset
- The main garage rectangle is 20 ft × 20 ft = 400 ft².
- A non-overlapping 4 ft × 5 ft offset adds 20 ft², making the gross measured section area 420 ft².
- A measured fixed footprint that will remain untiled is 20 ft², so the net floor area to tile is 420 − 20 = 400 ft².
- The example tile has an exact installed face of 12 in × 12 in = 1 ft², so the floor uses 400 exact tile equivalents before allowance.
- A user-selected 5% allowance adds 20 tile equivalents. The area-based tile quantity is therefore 420 tiles.
- At 24 tiles per pack, 420 ÷ 24 = 17.5, rounded up to 18 packs. Those packs supply 432 tiles, 12 more than the calculated requirement.
- A measured 16 ft garage-door opening divided by a 12 in compatible straight edge piece requires 16 edge pieces. Profile type and connector orientation still come from the selected system.
The hand-checked example requires 420 tiles after the selected allowance, 18 whole packs supplying 432 tiles, and 16 compatible straight ramp-edge pieces. Price is omitted because the calculator uses the user's current supplier quote rather than an invented market figure.
Before you start
How to measure
- Sketch the floor as non-overlapping rectangles. Use the largest rectangle as the main section, then add an alcove or offset as Section 2 and, if needed, another as Section 3.
- Measure each section at floor level. Keep length and width units attached to their fields, and do not count an overlapping patch in two sections.
- Measure only fixed footprints that will remain untiled. Add those footprints together and enter their total in square feet; do not subtract parked vehicles, movable benches, or storage you may later relocate.
- Read the exact installed face dimensions from the current product sheet. Modular garage tiles may be sold under a nominal size, and products within the same family can use different modules.
- Choose a cut/spare allowance that fits the actual perimeter, cuts, desired replacement stock, and installer plan. The tool deliberately starts at 0% rather than silently choosing a percentage.
- Enter the exact tiles-per-pack figure from the package or supplier listing. If the supplier sells individual tiles rather than packs, enter 1.
- For a straight ramp at the garage door, measure only the opening that will receive the profile and enter the exact compatible edge-piece length. Confirm loop/peg orientation, cuts, corners, and package quantity from the chosen system.
Local guidance
Notes for United States
- This page is published for US projects. Floor and obstruction results are shown in square feet, tile dimensions default to inches, and optional cost is shown in US dollars.
- Interlocking garage floor tile systems are not interchangeable. Tile module, connection geometry, expansion clearance, cut limits, edge profiles, and accessory packaging must come from the selected manufacturer's current instructions.
- Some installations start from a garage-door edge or another product-specific datum. An area estimate cannot determine the best starting line, seam placement, pattern, or direction.
- No live product price or default sales-tax rate is built in. Use the current pack price and combined local tax rate from your own quote.
Quick reference
Garage floor tile takeoff inputs
| Input | Use in the calculation | Check before ordering |
|---|---|---|
| Floor sections | Rectangle areas are added | Sections do not overlap and all intended tile area is included. |
| Untiled obstruction area | Subtracted from gross section area | The footprint is fixed and truly remains untiled. |
| Exact installed tile face | Length × width gives coverage per tile | Use the current product data, not a nominal family name. |
| Cut/spare allowance | Added to exact tile equivalents | The percentage matches the layout and replacement-stock plan. |
| Tiles per pack | Rounds tile requirement to whole packages | Package quantity matches the exact product and current listing. |
| Straight garage-door ramp | Opening width ÷ exact compatible edge length, rounded up | Confirm profile type, connector orientation, cuts, corners, and package quantity. |
The final pack count is an order estimate. Confirm product compatibility, installation clearances, accessory quantities, and supplier return policy before purchase.
Good to know
Common mistakes to avoid
- Using garage length × width but missing an alcove, step-in, offset, or storage bay that will also receive tile.
- Adding rectangular sections that overlap, which counts the same floor area twice.
- Subtracting movable cabinets, vehicles, or equipment even though tile will run below them or they may later move.
- Using a nominal 12-inch or 18-inch product label instead of the exact installed face dimensions in the current technical sheet.
- Treating the area-based result or main-rectangle grid preview as a finished installation layout and ignoring seam location, connector direction, product clearance, offsets, obstructions, and cut reuse.
- Rounding the tile count before applying the selected allowance, then rounding it again and unintentionally inflating the order.
- Ordering the calculated tile count without rounding to the supplier's current whole-pack quantity.
- Estimating ramp and edge pieces from area even though openings, corners, profile orientation, and system packaging control those accessories.
Need help?
Frequently asked questions
How many garage floor tiles do I need?
Enter the measured floor sections, any footprint that will remain untiled, the exact installed tile length and width, your allowance, and tiles per pack. The calculator reports exact tile equivalents, whole tiles after allowance, and whole packs separately.
Can I calculate an L-shaped garage floor?
Yes. Split it into non-overlapping rectangles: use the largest as the main section and enter the offset as Section 2. A third rectangle is available for another distinct offset. Do not count shared area twice.
Should I subtract cabinets and workbenches?
Subtract only a measured footprint that will definitely remain untiled. Do not subtract movable storage or equipment if tile will run beneath it or if the item could later move.
What waste percentage should I use for garage floor tiles?
The calculator does not prescribe one. Perimeter shape, cuts, layout direction, cut reuse, pattern, and desired spare stock all matter. Enter the allowance agreed with the installer or supported by the selected product plan.
Does this calculator count ramp edges and borders?
It can count compatible straight ramp-edge pieces for one measured garage-door opening when you enter the exact edge-piece length. It does not infer profile type, connector orientation, cuts, corners, side borders, or accessory pack quantities; confirm those from the selected system.
Is this the same as the ceramic tile calculator?
No. This tool is for modular or interlocking garage floor tiles sold as pieces or packs. Ceramic tile layouts have grout joints, boxes, and installation assumptions that belong in the separate tile calculator.
Keep planning
Related calculators
Measure with confidence
Planning guides for this project
Transparency
About this calculator
- Written by:
- BuildMeasure Editorial Team
- Technically reviewed by:
- Pending independent technical reviewer (formula unit-tested; see methodology)
- Last reviewed:
- 2026-07-23
- Formula version:
- 1.1.0
- Region reviewed for:
- United States
- Spotted an error?
- Report a correction
Methodology
- All entered lengths are converted to exact SI metres for arithmetic; displayed square feet use exact NIST-defined conversion factors.
- Floor geometry is modeled as the union of user-entered non-overlapping rectangles. The calculator cannot detect overlap, so the measurement sketch remains part of the takeoff.
- The main-rectangle preview counts rows and columns from the entered spans and installed tile face, and shows partial final-strip sizes before product-required clearance. It does not position offsets or obstructions, simulate seam placement, connector direction, balanced borders, or promise cut reuse.
- The cut/spare allowance remains visible as a separate tile-equivalent line. The combined requirement is rounded up to a whole tile once, then rounded up again only for the real pack quantity entered.
- Automated tests cover the hand-checked 400 ft² net example, optional sections, obstruction subtraction, exact pack boundaries, whole-pack rounding, optional straight ramp-edge rounding, optional user-entered cost, invalid inputs, diagram presence, and US-only publication.
Sources & standards
- RaceDeck — Garage Floor Installation: Primary manufacturer installation page describing garage length-and-width measurement and planning the door-opening edge before tile placement.
- RaceDeck — Free-Flow Technical Specifications: Primary manufacturer product sheet documenting a 12 in × 12 in tile module, product-specific wall/obstruction trimming guidance, and optional ramp edging.
- RaceDeck — Free-Flow XLC Technical Specifications: Primary manufacturer product sheet showing that another modular garage tile can use an 18 in × 18 in face and different clearance guidance, supporting exact product inputs rather than a universal default.
- NIST — SI Units: Length: Official exact definitions used for inch, foot, metre, and square-foot conversions.
This calculator provides an area estimate, a main-rectangle grid preview, tile-pack comparisons, and an optional straight ramp-edge estimate for modular or interlocking garage floor tiles. It does not create a complete installation plan, position offsets or obstructions, optimize offcut reuse, verify substrate condition, moisture, drainage, vehicle or load suitability, fire or slip performance, expansion clearance, product compatibility, profile orientation, cut rules, corners, accessory packs, code requirements, warranty conditions, or supplier availability. Follow the selected manufacturer's current instructions and confirm the final takeoff with the installer or supplier.