Garage floor tile measurement guide
How to Measure a Garage Floor for Interlocking Tiles
Record tileable floor sections, fixed obstructions, exact tile modules, wall clearances, door-edge runs, and pack details before ordering modular garage tiles.
Published 2026-07-23 · Updated 2026-07-23 · BuildMeasure Editorial Team
Next step
Turn your measurements into a material estimate
Enter the recorded dimensions in the calculator. It shows the calculated amount, wastage allowance, and a supplier-ready suggested order.
Open the Garage Floor Tile CalculatorMeasure the tileable footprint—not just the advertised garage size
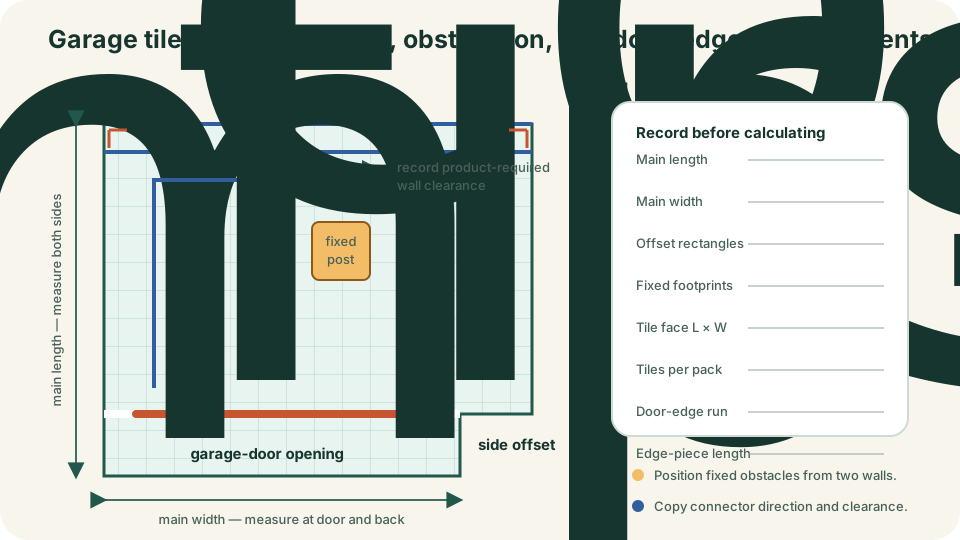
Measure the slab at floor level from boundary to boundary. Record the main length and width, then sketch every alcove, step-in, storage bay, or offset that will also receive tile as its own non-overlapping rectangle.
A nominal two-car-garage size is not an order measurement. Finished walls, curbs, columns, stairs, and door tracks can change the usable footprint, and opposite walls may not be parallel. Measure the same span near both ends and keep the larger physical dimension on the sketch.
Keep the physical slab dimensions separate from the final tile-covered span. The selected manufacturer's wall and fixed-object clearance is deducted during layout, not guessed before the product is chosen.
Choose one installation datum and mark connector direction
Manufacturer instructions commonly begin at the garage-door opening so compatible ramp edges can attach to an uncut tile row. Mark the intended starting corner, the garage-door line, and the tile connector direction on the sketch before counting rows.
Do not assume every interlocking system starts from the same side. Loop-and-peg or male-and-female orientation is product-specific, and cutting the wrong edge can remove the connection needed for a ramp profile.
- Mark the inside face of the closed garage door.
- Mark the left and right door rails.
- Mark the intended first full tile row.
- Copy the connector direction from the current installation sheet.
Record fixed obstructions without subtracting movable storage
Measure a column, lift post, permanently fixed cabinet, stair landing, or other footprint only when tile will definitely stop around it. Record its length and width plus its position from two known walls so the installer can place it on the layout.
Do not subtract a parked vehicle, rolling cabinet, workbench, or freestanding shelving when tile will continue below it. An area-only obstruction total helps the purchasing calculation, while the position measurements are still needed to plan cuts.
Use the exact installed tile face and current pack quantity
Record the exact installed face dimensions from the selected product sheet, not only a nominal family name. Modular systems can use 12-inch, 18-inch, metric, or other modules, and connection geometry can change the usable face.
Also record tiles per pack and the compatible ramp-edge piece length from the current supplier listing. The calculator keeps the theoretical area minimum, chosen spare allowance, main-rectangle grid positions, and whole-pack rounding separate so none is mistaken for another.
| Product field | Record | Why it matters |
|---|---|---|
| Installed tile face | Length × width with units | Sets area per tile and main-grid rows and columns. |
| Tiles per pack | Current whole number | Sets the pack-rounding step. |
| Required clearance | Each applicable wall or object | Changes final cut-strip sizes. |
| Ramp edge profile | Compatible type and connector side | A cut tile may not accept the selected profile. |
| Ramp edge length | Usable straight length per piece | Sets pieces needed across the measured opening. |
Do not combine parts from different tile families unless the manufacturer confirms compatibility.
Measure the garage-door edge as its own straight run
Measure the straight opening that will receive the ramp profile—often the distance between the garage-door rails rather than the full wall width. Keep this run separate from side borders, corners, pedestrian doors, and other exposed edges.
Straight edge pieces required = measured opening ÷ usable edge-piece length, rounded up. This count does not select looped versus pegged profiles, decide whether a cut piece is allowed, or convert pieces into accessory packs; confirm those details with the chosen system.
Garage tile field worksheet
Complete the field sketch and product record before opening the calculator. Keep the sheet with the supplier quote so a changed tile size, pack quantity, or edge profile can be recalculated without measuring the garage again.
- Main slab length measured at both side walls
- Main slab width measured at the door and back wall
- Every tileable offset drawn as a non-overlapping rectangle
- Fixed untiled footprints measured and positioned from two walls
- Movable storage left inside the tileable area
- Garage-door opening measured between the intended ramp-edge endpoints
- Starting corner and connector direction copied from product instructions
- Exact installed tile face, pack quantity, clearance, and edge-piece length recorded
- Supplier asked about compatible profiles, corners, cuts, returns, and spare stock
Same project
Related measurement guides
Sources and limits
Check the project-specific details
- RaceDeck — Garage Floor Installation — Primary manufacturer instructions for measuring, beginning at the door opening, connector direction, expansion space, trimming, and ramp edges.
- Swisstrax — Installation Instructions — Primary manufacturer instructions for the starting point, product-specific wall clearance, door-edge placement, and final cuts.
- ModuTile — Interlocking Garage Floor Tile Installation — Primary manufacturer guidance explaining why the garage-door row and connector orientation affect cuts and ramp-edge attachment.
- NIST — SI Units: Length — US government reference for the exact length conversions used by the linked calculator.
Review status: Formulas and conversions covered by automated tests; measurement practice pending human trade review.
This guide supports planning only. It does not specify structural design, code compliance, or a supplier quotation.