Flooring planning guide
How to Measure an Irregular Room for Flooring
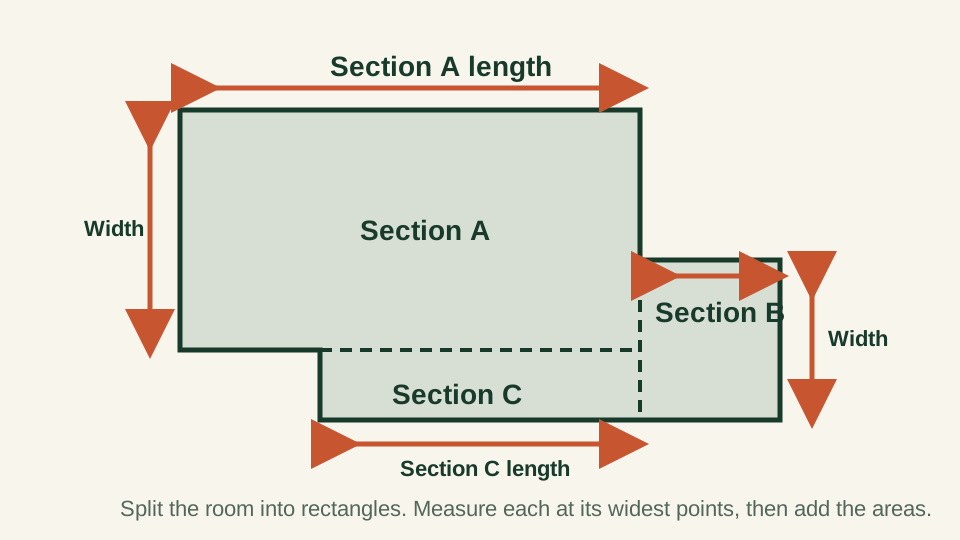
Split an L-shaped or irregular room into rectangles, measure each section at its widest points, and add the areas with a worksheet you can copy.
Published 2026-07-16 · Updated 2026-07-16 · BuildMeasure Editorial Team
Next step
Turn your measurements into a material estimate
Enter the recorded dimensions in the calculator. It shows the calculated amount, wastage allowance, and a supplier-ready suggested order.
Use the Flooring CalculatorThe section method: split the room into rectangles
You cannot multiply one length by one width in an L-shaped room and get the right answer. The reliable method is the one estimators use: split the floor into rectangles, measure each rectangle separately, and add the areas together.
Sketch the room first, without worrying about scale. Draw dashed lines that cut the floor into the fewest rectangles that cover it: the main room, then each alcove, bay, closet, and connected hallway as its own section. Every section gets a letter on the sketch and a row on your worksheet.
Closets and connected hallways count. If the same flooring runs into them, they are part of the order, and forgetting a closet is one of the most common ways floors come up a pack short.
Measure each section at its widest points
Measure each rectangle at its widest and longest points, wall to wall. As with any room, take the length at more than one spot if the walls look uneven and keep the larger figure. Flooring is cut down to fit; it cannot be stretched, so the larger figure is the safe one.
Convert inches to decimal feet before you multiply. Six inches is 0.5 ft, 3 inches is 0.25 ft, 9 inches is 0.75 ft. Then multiply length by width for each section and write the area in the last column.
| Section | Length ft | Width ft | Area sq ft |
|---|---|---|---|
| A - Main room | 14.0 | 12.0 | 168.0 |
| B - Bay window recess | 6.0 | 2.5 | 15.0 |
| C - Closet | 4.0 | 3.5 | 14.0 |
| D - Hallway | 9.0 | 3.0 | 27.0 |
| Total | - | - | 224.0 |
168 + 15 + 14 + 27 = 224 sq ft. Enter the total into the flooring calculator before waste; the waste allowance is applied to the whole job, not section by section.
Doorways and transitions between floors
Measure through doorways to the point where your flooring will actually stop. If the new floor meets a different floor in a doorway, the change normally happens under the closed door, so include the floor area up to the middle of the door opening.
Note every transition on your sketch: new floor to tile, new floor to carpet, new floor to an exterior threshold. Each one needs a transition strip or threshold piece sized to the doorway width. Transition pieces are bought as separate parts, so listing them while measuring saves a second trip.
- Sketch drawn and split into lettered rectangles
- Every closet, alcove, bay, and connected hallway included
- Each section measured wall to wall at its widest points
- Inches converted to decimal feet before multiplying
- Section areas added into one job total
- Each doorway transition listed with its width
Angled walls: use the bounding rectangle
For a section with an angled wall, such as a bay window or a room corner cut at 45 degrees, the simple and safe approach is to measure the bounding rectangle: the smallest full rectangle that contains the angled section. Multiply its length by its width and use that as the section area.
This deliberately overstates the floor area, because the triangle outside the angled wall is counted even though it will not be covered. Treat that surplus as part of your cut waste. Angled walls force diagonal cuts in the flooring anyway, and the offcuts from those diagonal cuts are rarely reusable, so in practice the bounding rectangle is a conservative but honest estimate rather than padding.
If you prefer a tighter figure, you can calculate the triangle, half of its base times its height, and subtract it. Do that only when the triangle is large, for example a wall running diagonally across a whole room. For a typical clipped corner or bay, the bounding rectangle keeps the worksheet simple and errs on the side of finishing the job.
Same project
Related measurement guides
Sources and limits
Check the project-specific details
- National Wood Flooring Association — US industry association whose installation guidelines cover subfloor preparation, layout, and expansion gaps for wood flooring. Linked at the top level because guideline documents are member resources.
- Shaw Floors - How to guides — Manufacturer how-to library covering measuring and installation basics for common flooring types.
Review status: Formulas and conversions covered by automated tests; measurement practice pending human trade review.
This guide supports planning only. It does not specify structural design, code compliance, or a supplier quotation.