Tile planning guide
How to Measure a Floor for Tile
Measure a room for floor tile the way installers do: length and width at several points, a squareness check, and clear notes on excluded areas.
Published 2026-07-16 · Updated 2026-07-16 · BuildMeasure Editorial Team
Next step
Turn your measurements into a material estimate
Enter the recorded dimensions in the calculator. It shows the calculated amount, wastage allowance, and a supplier-ready suggested order.
Use the Tile CalculatorMeasure length and width at more than one point
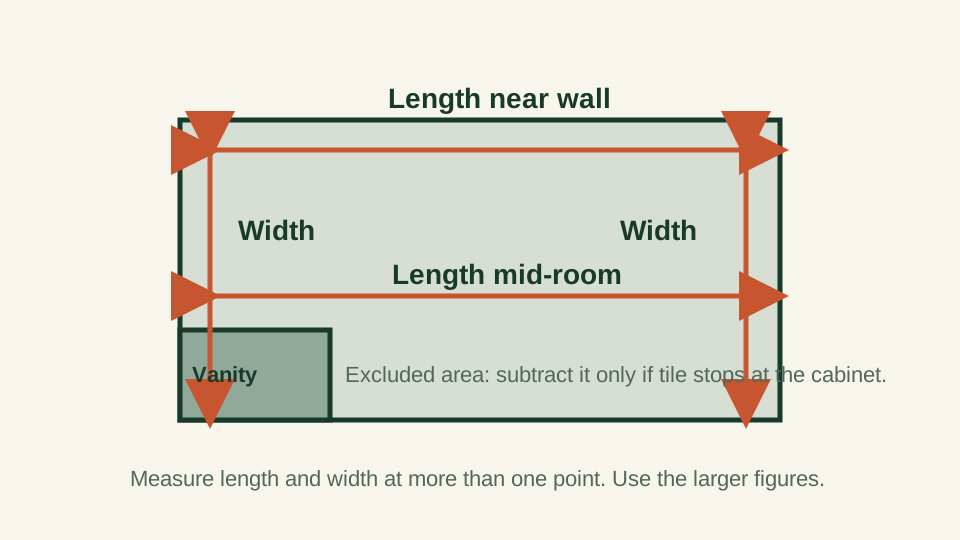
Rooms are rarely perfectly square. Walls bow, drywall corners build up, and older houses settle, so the length at one wall is often an inch or two different from the length in the middle of the room.
Measure the length of the room at two or three points: near each side wall and across the middle. Do the same for the width. Record every figure, then use the largest length and the largest width for your area calculation. Tile is cut to fit the room, so planning from the larger dimensions keeps you from coming up short.
Measure at floor level, not at counter height. Baseboards can be removed before tiling, so measure wall to wall, not baseboard to baseboard, if the trim is coming off.
- Use a tape measure or laser measure and read to the nearest 1/4 inch.
- Convert inches to decimal feet before multiplying: 6 in = 0.5 ft, 3 in = 0.25 ft, 9 in = 0.75 ft.
- Sketch the room and write each measurement on the sketch where you took it.
Check squareness with the 3-4-5 triangle
Before you trust a simple length times width calculation, check whether the room is close to square. Measure 3 feet along one wall from a corner and 4 feet along the adjacent wall from the same corner, then measure diagonally between those two marks. If the corner is a true 90 degrees, the diagonal is exactly 5 feet.
A diagonal noticeably longer or shorter than 5 feet means the walls are out of square. The room area calculation still works, but expect more tapered cuts along one wall, which uses more tile. Note out-of-square corners on your sketch so you can discuss layout with your installer or plan the taper into a less visible wall.
Think about where the tile layout starts
Installers rarely start tiling from a wall. A common approach is to snap layout lines at or near the center of the room and work outward, so cut tiles at opposite walls are similar in size. This is a planning consideration, not a measuring step, but it affects how much tile the cuts consume.
The layout to avoid is one that leaves a sliver cut, a strip of tile narrower than about a third of a tile, along a visible wall. Slivers are fragile, hard to cut, and obvious to the eye. If a centered layout produces a sliver on one side, the layout is usually shifted by half a tile so both walls get a wider cut.
You do not need to finalize the layout to order tile. You do need to know that centered layouts and shifted layouts both generate cuts along every wall, which is exactly what the waste allowance in your order covers.
Measure around fixed obstacles
Decide, obstacle by obstacle, whether tile runs under it or stops at it. Tile normally runs under freestanding appliances such as a range or refrigerator, because those can be moved later. Tile usually stops at permanently fixed items such as a built-in vanity cabinet, an alcove tub, or a kitchen island that is anchored to the subfloor.
For each area where tile stops, measure that footprint as its own rectangle and subtract it from the room area. For each area where tile continues underneath, leave it in. Write the decision next to the measurement so the number is explainable later.
When in doubt, leave the area in the total. Tiling under a vanity costs a little more tile now but keeps your options open if fixtures change later.
Record the tile size and grout joint
The tile itself is part of the measurement record. Write down the nominal tile size from the box, for example 12 by 24 inches, and the grout joint width you plan to use, for example 1/8 or 3/16 inch. The tile size and joint width determine how many tiles cover a square foot and how the pattern lands against your walls.
Tile Council of North America (TCNA) guidance and manufacturer instructions also tie the grout joint and installation method to the tile format, so having these numbers written down helps every later conversation with a supplier or installer.
- Room length measured at 2-3 points, largest figure circled
- Room width measured at 2-3 points, largest figure circled
- 3-4-5 squareness check done in at least one corner
- Each obstacle labelled: tile under it, or excluded
- Excluded footprints measured as rectangles
- Tile size and grout joint width recorded
- Sketch with all figures kept for the order
Worked example
A bathroom measures 12 ft 0 in at its longest and 9 ft 6 in at its widest. Convert to decimal feet: 12 ft times 9.5 ft equals 114 sq ft gross floor area.
The built-in vanity is 4 ft 0 in wide and 1 ft 9 in deep, and the tile will stop at its toe kick. That footprint is 4 ft times 1.75 ft, which is 7 sq ft. Subtracting it leaves 114 minus 7, or 107 sq ft to tile.
Adding a 10 percent planning allowance for cuts and breakage, a figure commonly used for straight layouts but not a guarantee, gives 107 times 1.10, which is 117.7 sq ft. Enter 107 sq ft and your chosen allowance into the tile calculator and it will convert that into tile and box counts for your tile size.
Same project
Related measurement guides
Sources and limits
Check the project-specific details
- Tile Council of North America — US tile industry standards body; publishes the TCNA Handbook for ceramic, glass, and stone tile installation. Linked at the top level because handbook deep links require purchase.
- Daltile — US tile manufacturer; product pages state nominal tile sizes and installation guidance. Linked at the top level because resource URLs change.
Review status: Formulas and conversions covered by automated tests; measurement practice pending human trade review.
This guide supports planning only. It does not specify structural design, code compliance, or a supplier quotation.