Tile planning guide
How to Measure a Kitchen Backsplash for Tile
Multiply each wall run by the counter-to-cabinet height, deduct windows, tile around outlets, and keep field tile separate from trim before ordering.
Published 2026-07-20 · Updated 2026-07-20 · BuildMeasure Editorial Team
Next step
Turn your measurements into a material estimate
Enter the recorded dimensions in the calculator. It shows the calculated amount, wastage allowance, and a supplier-ready suggested order.
Use the Tile CalculatorThe short answer: measure the field, then handle openings and trim
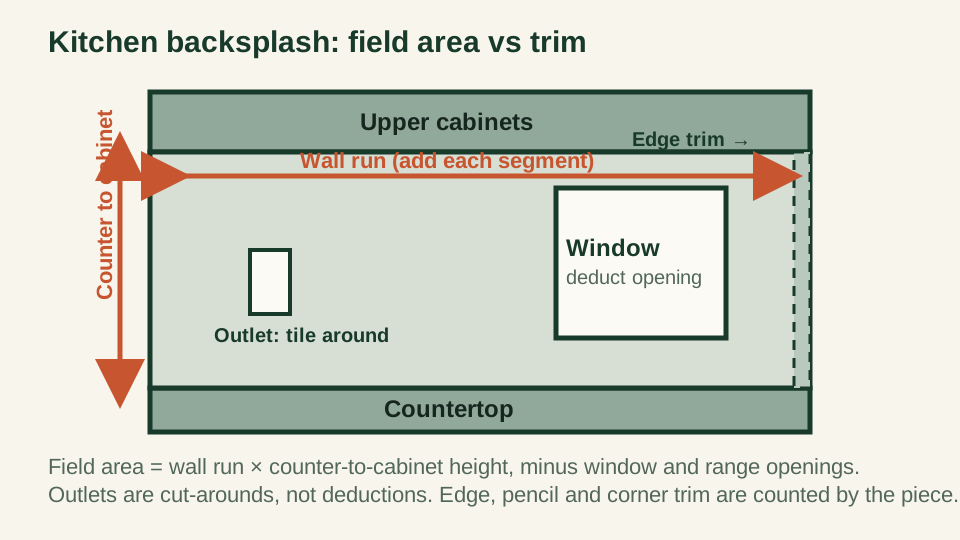
A backsplash is a vertical strip of wall, so its area is the wall run multiplied by the height from the countertop to the underside of the upper cabinets. That rectangle — the field — is what the tile calculator sizes. Everything else is either an adjustment to that rectangle or a separate line on your order.
Three adjustments turn the gross rectangle into a real order: subtract openings where the tile genuinely stops, such as a window or the gap behind a slide-in range; leave electrical outlets in as cut-arounds rather than deductions; and count edge, pencil, and corner trim as separate pieces, because trim is bought by the piece, not by the square foot.
- Field area = wall run × counter-to-cabinet height (add each wall segment).
- Deduct only openings where tile genuinely stops (window, range gap).
- Outlets are tiled around — record them, do not subtract them.
- Trim (edge, pencil, corners) is counted separately from the field.
Measure the field as wall runs times one height
Measure the horizontal run of counter along each wall the tile will cover, in feet, and measure the vertical gap from the countertop up to the underside of the wall cabinets. That gap is commonly around 18 inches, but it changes with cabinet mounting height, so measure your own rather than assuming a figure.
Most kitchens have more than one run — a main wall plus a return by the range or sink. Measure each run separately and add the areas. Where the field steps up behind a range or hood to a taller height, treat that taller section as its own rectangle so a single height does not overstate the rest of the wall.
Convert inches to decimal feet before multiplying so the units stay consistent: 18 inches is 1.5 feet, 6 inches is 0.5 feet, and 3 inches is 0.25 feet. One inch is exactly 25.4 millimeters and one foot is exactly 0.3048 meters, which is the conversion the calculator uses internally.
Outlets and windows: a cut-around is not a deduction
An outlet or switch in a backsplash is small, and tile still runs right up to and around it. You cut tiles to fit the box, and those offcuts are usually unusable, so an outlet slightly increases the tile you consume rather than reducing it. Record how many outlets there are as a note to your installer, but do not subtract their area from the field.
A window, or the open gap behind a slide-in range where no tile is fitted, is different: the field genuinely stops there. Measure that opening and subtract it from the gross field area. The rule is simple — deduct an opening only when tile does not cover it, and keep it in when tile runs across or around it.
Separate the field tile from the trim
Field tile is the repeating surface — subway tile, mosaic sheets, or a square format — and it is bought by area. Trim is the set of finishing pieces that cap exposed edges: pencil liners, bullnose or quarter-round edges, and inside or outside corner pieces. Trim is bought by the piece or by the linear foot, and it is priced and packaged apart from the field.
The American National Standard for ceramic tile, ANSI A137.1, lists trim units as their own product category alongside field tile, which is why a supplier treats them as separate line items. Enter only the field area into the tile calculator; count the trim against the length of exposed edge — typically the top of the run and any outside corner — and add it to your order as its own quantity.
| Item | On the backsplash | How it is counted |
|---|---|---|
| Field tile (subway, mosaic, square) | The main wall surface | Area → tile calculator |
| Counter-to-cabinet gap | Full height of the field | Part of the area |
| Window or range gap where tile stops | Opening in the field | Deduct its area |
| Outlet or switch | Tiled around, small offcuts | Record; do not deduct |
| Edge, pencil, and corner trim | Finishes exposed edges | Count by the piece / linear foot |
ANSI A137.1 defines trim units as their own products. Field tile is ordered by area; trim is ordered by the piece, so keep the two counts apart.
Worked example: an L-shaped counter run
Suppose the backsplash covers two walls: a main run of 8 feet and a return of 4 feet, both with a measured counter-to-cabinet height of 18 inches, which is 1.5 feet. A window over the sink, where the tile stops at the casing, measures 3 feet wide by 1 foot tall, and three outlets sit within the field.
The gross field is 8.0 × 1.5 plus 4.0 × 1.5, which is 12.0 plus 6.0, or 18.0 square feet. Deduct the 3.0-square-foot window opening to leave 15.0 square feet of field. The three outlets stay in — they are tiled around — so the field to order is 15.0 square feet.
Enter 15.0 square feet as a direct area in the tile calculator, along with your tile size, grout joint, and the overage allowance you choose to enter. Overage is your input, not a figure this guide sets, and a small mosaic or a busy pattern warrants a larger one. Order the top-edge trim — roughly the 12 feet of exposed top edge plus any outside corner — as a separate quantity.
| Step | Calculation | Result |
|---|---|---|
| Main wall run × height | 8.0 ft × 1.5 ft | 12.0 sq ft |
| Return wall run × height | 4.0 ft × 1.5 ft | 6.0 sq ft |
| Gross field area | 12.0 + 6.0 | 18.0 sq ft |
| Deduct window opening | 3.0 ft × 1.0 ft | −3.0 sq ft |
| Field area to tile | 18.0 − 3.0 | 15.0 sq ft |
Three outlets were recorded and tiled around, so they are not deducted. Enter 15.0 sq ft and the overage you choose into the tile calculator, and order edge trim separately.
Backsplash measurement worksheet
Work along the counter one run at a time and write every figure down, so the field area, the deductions, and the trim are all explainable when you reach the supplier.
- Each wall run measured in feet and listed separately
- Counter-to-cabinet height measured on the actual wall
- Taller sections behind range or hood measured as their own rectangles
- Window and range openings measured and marked for deduction
- Outlets and switches counted and noted as cut-arounds
- Exposed top edges and outside corners measured for trim
- Field area, chosen overage, tile size, and grout joint ready for the calculator
Same project
Related measurement guides
Sources and limits
Check the project-specific details
- Tile Council of North America (ANSI standards) — US tile standards body; ANSI A137.1 defines ceramic tile including trim units, and the A108/A118 series covers installation. Linked at the top level because the standards are paid publications.
- NIST — SI Units: Length — US government reference for the exact inch (25.4 mm) and foot (0.3048 m) definitions used when converting your measurements.
- Daltile — US tile manufacturer; product pages state nominal tile and trim sizes and installation guidance. Linked at the top level because resource URLs change.
Review status: Formulas and conversions covered by automated tests; measurement practice pending human trade review.
This guide supports planning only. It does not specify structural design, code compliance, or a supplier quotation.